


HOW TO BUILD A CONCRETE STEP
In my first home, I repainted walls. In the second, I also installed a kitchen, layed tiling & parquet floor. The third, we constructed it, now almost nothing frighten me. Beware, this post has a high glamorous potential! But please don’t run away – I’m persuaded that having a drawer filled of clothes for DIY-ing isn’t incompatible with a well stocked make-up case. For a long time, I thought that masonry was too hard, too heavy, too technical and too dirty, I couldn’t imagine putting hands in concrete.
And then, we built our house.
Positive side? We’re Masters ! We wanted airy volumes, materials unity, we were able decide of everything, from A to Z.
Negative side? A colossal construction site and not stretchable financial ressources.
Our home is practically finished now but longest task still remain: landscaping. We have the chance to live in a preserved natural area, but our plot of land is sloping and requires staircases. To access my workshop, it’s necessary to walk down a steep slope. And when it’s raining, all driveway gravel are hurtle down the slope, making any plantation impossible in this place. Before Spring, my plan is to create a stepped concrete alley going to my workshop.
Finished path will be 6 metres long, it’s rather a big task. But I’m going to build it by steps. If I proceed stage-by-stage, it already seems less impressive.
First stage ? Build landing concrete step.

I had some apprehensions but, finally, longest stage was to create the wooden form. It’s essential to make a levelled step. To make this garden concrete step, I proceeded as if I was baking a cake:
- fabricate a mould and set it up
- blend paste
- pour it into the mould alternating layers
- let take in the mould
- tadaaam, open the mould !
Not so complicated finally. May I expain it in detail?


How to make a concrete step
necessary tools & materials
To create a concrete formwork
- level, if possible large, measuring tape, carpenter’s square, pen
- jigsaw
- screwer & screws
- oil
- protection gloves & glasses
- scaffolding board
To pour concrete
- level, trowel, trough, sponge
- masonry mortar
- water
- pebbles
- masonry glass fibre mesh
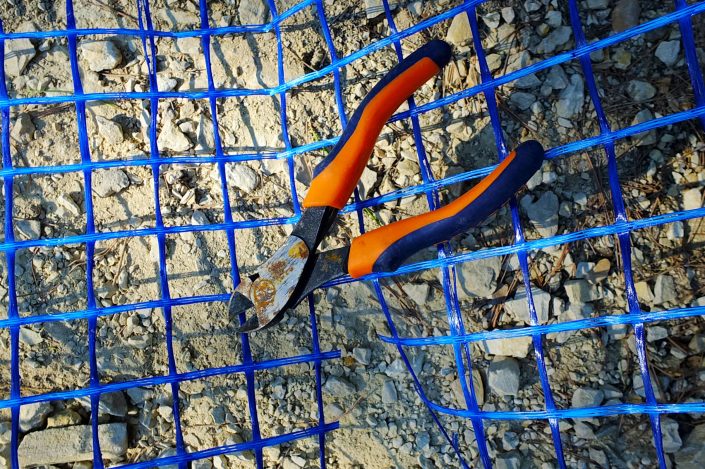
- cutting pliers
Wear old clothes and sneakers, protcetive glasses & gloves. Let’s start !

Make the formwork
- I bought in a DIY store scaffolding board to make my frame. As it was too long for my car, I sew it before loading.
- I first make the mould to pour concrete in it. In this case it was a bit complex, it isn’t levelled & a old concrete slab complicated this task. To make the wooden formwork, I carry different heights, so top of the step is flat. I tried it on site and sewed again several times until it’s right. To drain water when raining, I made a gutter along a side.
- Beware, to avoid cracking, it’s necessary to create expansion joint between existent wall and new step. In this case, I left 2.5 cm, it’s scaffolding board thickness.
- I assemble formwork together with screws, so, I could easily disassemble it once step is dry. This task took me abit more than an hour, due to many cuts on this particular formwork. If your ground is levelled, it should be much simpler.
- I check with my level that the formwork is well levelled once in place, then I cut masonry glass fiber mesh. As I plan to extend this step by a path, I let mesh exceed the formwork. Bottom glass fiber mesh will only be one piece between step and path and link both. This will avoid crackings.
- I placed mesh, then formwork, check it was levelled, than secure it with concrete blocks & stones I found in the garden. Beware that concrete is really heavy and your framework shouldn’t move during concrete pouring process.
- I generously oiled formwork to make unmolding easier, as a mould is greased to make a cake.


Pour concrete step
- Then, I passed to concrete preparation stage. In a DIY store, I bought masonry mortar bags. Unlike concrete, mortar doesn’t contain gravel. For my project, mortar was more adapted: easier to blend as smoother, it allows to get a clean finish on the step visible faces. And as I live in scrubland, no problem to find pebbles.
- In the trough, I blended mortar by half bag with some water until I get creamy mixture. Beware, concrete, or mortar in this case, dry skin, don’t forget to glove your hands.
- My formwork was placed on a concrete slab but if your ground is less stable, I recommend you to put pebbles and sand in your framework bottom. If, like me, you construct your step on existing concrete, moisturise it before.
- I raised glass fiber mesh & poured 5 cm thick mortar, in which I pressed pebbles. I placed back fiber glass mesh before making a second layer.
- Again, I poured mortar with pebbles and fiber glass mesh layer over. I particularly paid attention to jiggle mortar to avoid bubbles on the step front face. Beware, mesh must be shorter than framework to disappear in the mortar, otherwise front face of your step won’t be aesthetic.
- I stacked layers on each other. Every 5 – 8 cm thick, I recommend you to put down a piece of glass fiber mesh.
- Arrived at formwork top level, I smoothed mortar to get it plan. You can use your level to ensure not having hollow.
- Concrete step pouring took me two hours.
- I let it dry a couple of hours until step top is hard as leather, still humid but already solid. Gloved hands, with a humid sponge, I slowly mopped step top with circular movements to make it harsh & have grains. If you don’t do it, step might be slippery when it’s humid.
- Finally, I let dry the step in its framework. A week afterwards I unmold it. I just had to unscrew formwork boards. Step will be completely dry in three weeks, so it’s better to avoid walking on it yet.
Cost of step : 100 cm large – 25 cm depth -25 cm high :
- scaffolding board – 6 euros
- 2 bags of masonry mortar – 11 euros
- glass fiber mesh – 3 euros ( rest of roll will be used later )
Total cost of this concrete step is 20 euro of materials and 3:30 work to construct it. OK, I still remaind 8 more steps to finish my path! Wish me good luck.
Finally, masonry isn’t so complicated. It needs thoroughness and preparating time to get a clean result. For this project – a garden step in concrete – most tiring was making & installating formwork. I will not become a mason but I’m not anymore afraid to build steps or low walls. Besides, I also built on my own the planter next to the step. And I’m rather proud of result !
And you, have you already tried masonry tasks ?
This post was written by Daphne
1 Commentaire
14 septembre 2016 3 h 44 min
That’s so cool. I hope I can try it one day!